Laundry Room Update
Hello friends,
How is your week going so far? I’m working through a list of to-do’s and trying to mix in some fun in between. One of the things I’ve been behind on doing is uploading photos from my phone and in going back through the months I came across a home DIY project I did last year at our previous home. I thought I’d sit down to write a quick post to share it with you to show you the before and after pics! This falls in line with the previous home tour I’ve been leading you on so I’m mixing it in.
If you’re considering a DIY project on a budget - make sure to pin this post to Pinterest for later!

Here’s a photo of my beautiful laundry room at our previous home. Isn’t she lovely? Kind of makes you wonder what it looked like before right? Well, let’s dig in.
When we purchased that house it was a new build that the builder used as a spec home and because of that (I suspect) he used different floor tile in all of the bathrooms and laundry room. Well, two of those choices were hideous!!
After living there about a year I started to research floor paint and watch videos and read reviews. It wasn’t something that would last forever, but it would give us an immediate update without the hassle of renovations and would give us some time to decide if we wanted to have new tile installed.
This was also the deciding factor when I decided to try peel and stick wallpaper and peel and stick backsplash tile. Wallpaper is a commitment and I wasn’t quite sure I’d love the bold print I chose. I figured if I liked the outcome enough and when/if it started to fall off then I would have a professional come to hang the traditional style of wallpaper and actual tile backsplash. *Note - I did have the real, identical tile backsplash professionally installed before we listed the house for sale.
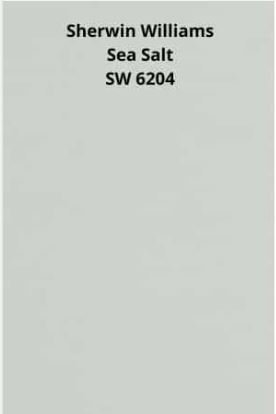
So this is the laundry room BEFORE I did anything. Hideous floor tile that I guess is meant to look worn and rustic. There was nothing fun or exciting about being in that room and it was where our cat did his business. The builder used a very light mint-ish green on the cabinets from Sherwin Williams called “Sea Salt” that matched the kitchen island and the mudroom. Because of this color, I needed to work with wallpaper that would pair well with the cabinets.
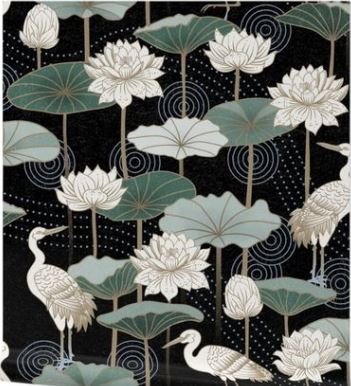
You can see the wallpaper sample I chose on the wall. =)

After ordering various peel and stick samples from Spoonflower, I decided to go with White Lotus Tranquility in the jumbo print. It had just enough green to tie in with the Sherwin Williams “Sea Salt” cabinet color. I also knew that the peel and stick samples would start lifting off of the wall after a few days and that a peel and stick wallpaper likely wouldn’t last long given we had textured walls. However, I was OK with this because if I truly liked the wallpaper pattern then I figured I’d order it again in a traditional pasted option. *Spoonflower is amazing, y’all. You can choose a design you like and order it in 4 different types of wallpaper or in a dozen types of fabric. I have used them for three other fabric projects (more on those in a different post later on).
At that time, I was using a folding drying rack and had our cleaning items hanging on that wall across from the washer/dryer.
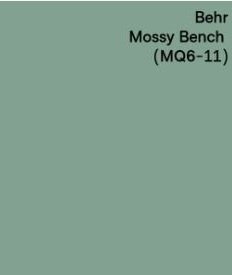
Once I had the wallpaper picked out I chose a green color for the walls to coordinate. I wanted to get as close to the Sherwin Williams color “Underseas” as possible because it is the color the builder used in our powder bathroom and I loved it, but at the time I didn’t know the name of the paint color. I ended up using Behr “Mossy Bench”.
I purchased the Rust-Oleum Home Floor Coating kit and Home Depot will mix it to the color you choose that Rust-Oleum offers. We went with “pearl gray”. Based on the square footage, this kit provided enough paint to do two coats of paint (it must fully dry in between) and more than enough of the gloss sealant. The sealant requires 7 days for a full curing time so I didn’t go back to add another coat.
The peel and stick tile backsplash looked like 2x2 inch glossy black tiles. It stayed on well where I placed it once, but the pieces that were taken off to straighten didn’t - so again I knew this was a short term fix. We had a professional install black ceramic tiles with black grout before we listed our house for sale. It looks identical!
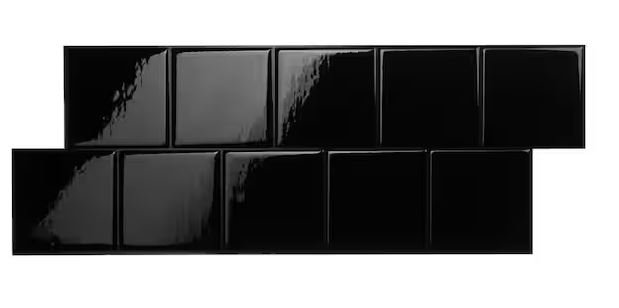
Peel and Stick Tile

Black Gloss Ceramic Tile
I painted the three walls first. Then added the wallpaper with a little bit of glue that we’ve had for years, hoping this would help it stick a little longer, then added the peel and stick tile backsplash and painted the floors.
We had to wait a full 7 days after the floors were painted to have someone come to move the washer/dryer back into the laundry room and hook them up. Then I got busy with the decorations!!! I decided to add floating shelves above the w/d and chose Rubbermaid Driftwood Grey from Lowe’s. It comes in three different lengths and the longest length was perfect for that spot using black floating shelf brackets from Amazon.
I got rid of the carpeted cat stairs and found this narrow little two-level side table that would fit in between the counter and dryer so that our cat could still get up to his spot. It worked perfectly for him.

Then we added two wall mounted drying racks and moved the mop/broom holder to behind the door. I cannot express enough how much I loved those drying racks!!
I am still so pleased with the result of our former laundry room and even the husband claimed it was his favorite room in the house. 😂 The husband who literally told me NOT to do this project because he feared it was too much to do and he didn’t want to have to help me in any way. MEN. UGH.
Anyway, I loved the outcome and am so glad I did it and hope the new owners will appreciate my efforts. I will say that had I considered that we’d ever be listing the house for sale a year later I would have either left the ugly tile floor or actually had someone come to replace it with real tile. The painted floor was scratched by the guy who moved the washer/dryer back into the room and I know that it won’t hold up long term anyway. But, again - for an inexpensive update it made sense at the time.
So here’s the list of things I used and the decor I purchased!
Spoonflower White Lotus Tranquility, jumbo.
Home Depot Rust-Oleum Home floor coating kit, pearl gray
Lowes Black Gloss Ceramic Tile (replaced the peel and stick tile)
Amazon Floating Shelf Brackets, 12 inch in black
Amazon Boho Area Rug 4’x6’ in “black white”
Amazon “Load of Fun Laundry Schedule” sign (decor on shelf)
Amazon AuldHome Farmhouse Laundry Powder Container (decor on shelf)
Amazon Anchor Hocking 2 Gallon Heritage Hill Glass Jar with Lid (decor on shelf)
Amazon Honey-Can-Do Dry-04445 Large Wall-Mounted Drying Rack, white
Amazon Woll Dryer Balls (decor on shelf)
Amazon Wobane LED Closet Light Motion Activated (I added these underneath the cupboards so that when we or the kitty went into the room it would automatically come on and give a little light. They stick right on like a roll of tape! It is rechargeable.)
I found the baskets, black beaded lantern, and faux plants/flowers at Marshalls and Home Goods
I found the sign “Laundry Room For Same Day Service Do It Yourself” at Michaels at that time - I don’t know that you can find it there now and I couldn’t find it online just now but it’s bound to be out there. There’s a ton of similar ones for sure.
So that is it! What do you think about my laundry room makeover project? It really spruced up a dull room and every single time I went in there I honestly admired my work. 🤣 Does it inspire you to tackle any DIY projects at home? Have you done any room makeovers at your house? Comment below!
Some of the links in this post are affiliate links and if you use them to make a purchase I will earn a small commission at no cost to you.
XOXO
